Auto-completion of Kubernetes Custom Resource Definitions (CRDs)
Custom Resource Definitions (CRDs) are a powerful way to extend Kubernetes. They let products provide their own Kubernetes resource types tailored to their specific needs. A Kubernetes operator may then use such a CRD to manage applications or provide other custom behaviour. Writing these CRDs freehand can be error-prone. It's easy to misplace indentation in YAML or mistype a property name. If these mistakes make it into a cluster, they might only surface when a pod fails to start or a resource behaves unexpectedly.
This can get painful quick. When using GitOps, each failed attempt leaves a trail of breadcrumbs in the Git history showing our trials and tribulations in all their glory. Even worse, the mistake might end up in a live cluster, before you've had a chance to catch it.
Auto-completion helps suggest options as you type, gives you documentation in your editor and runs schema validation immediately against your changes, highlighting any errors.
In this post, I’ll walk through:
- how you can set up local Kubernetes resource validation both in VS Code and Neovim
- how to explore CRDs from the command line,
- and how to catch invalid YAML before you commit.
All trying to guide you to correct issues early, before pushing them out into the wild World.
kubectl explain
Before jumping into the editors, it's worth noting that Kubernetes already provides some handy ways to explore CRDs with the CLI.
We can start by listings the CRDs that are available in our cluster. This shows what has been installed and what is available to us.
❯ kubectl get crd
NAME                                                      CREATED AT
addons.k3s.cattle.io                                      2025-06-08T11:17:32Z
alertmanagerconfigs.monitoring.coreos.com                 2025-06-08T13:25:24Z
alertmanagers.monitoring.coreos.com                       2025-06-08T13:25:22Z
applications.argoproj.io                                  2025-06-08T11:22:49Z
...
Pick one and dig in with kubectl explain to describe the purpose of
this CRD along with top-level properties:
❯ kubectl explain prometheus
GROUP:      monitoring.coreos.com
KIND:       Prometheus
VERSION:    v1

DESCRIPTION:
    The `Prometheus` custom resource definition (CRD) defines a desired
    [Prometheus](https://prometheus.io/docs/prometheus) setup to run in a
    Kubernetes cluster. It allows to specify many options such as the number of
    replicas, persistent storage, and Alertmanagers where firing alerts should
    be sent and many more.
...
Now, the vanilla kubectl explain only shows the top-level fields.
  spec  <Object> -required-
    Specification of the desired behavior of the Prometheus cluster. More info:
    https://github.com/kubernetes/community/...
We can drill down into each one by specifying the dot-separated path of the
desired field, for example kubectl explain prometheus.spec. The --recursive
argument provides an overview of all the fields, including nested fields, in an
indented tree structure.
kubectl explain --recursive prometheus.spec
...
  shards        <integer>
  storage       <Object>
    disableMountSubPath <boolean>
    emptyDir    <Object>
      medium    <string>
      sizeLimit <Object>
...
We can explore a specific property from this recursive list, for example
kubectl explain prometheus.spec.shards. All this information is coming from
the Open API schema in the CRD resource
definition kubectl get crd prometheuses.monitoring.coreos.com -o yaml
---
schema:
  openAPIV3Schema:
    description: |-
      The `Prometheus` custom resource definition (CRD) defines
This schema definition is what helps tooling to implement auto completion in editors and schema validation in our deployment pipelines, so let's get into what this tooling can do given these schemas.
CRD completion in VSCode
With VS Code, install the Kubernetes extension from Microsoft. This plugin provides functionality beyond resource validation, such as viewing clusters, following logs and browsing helm charts, however for now we'll focus on the resource validation side of it.

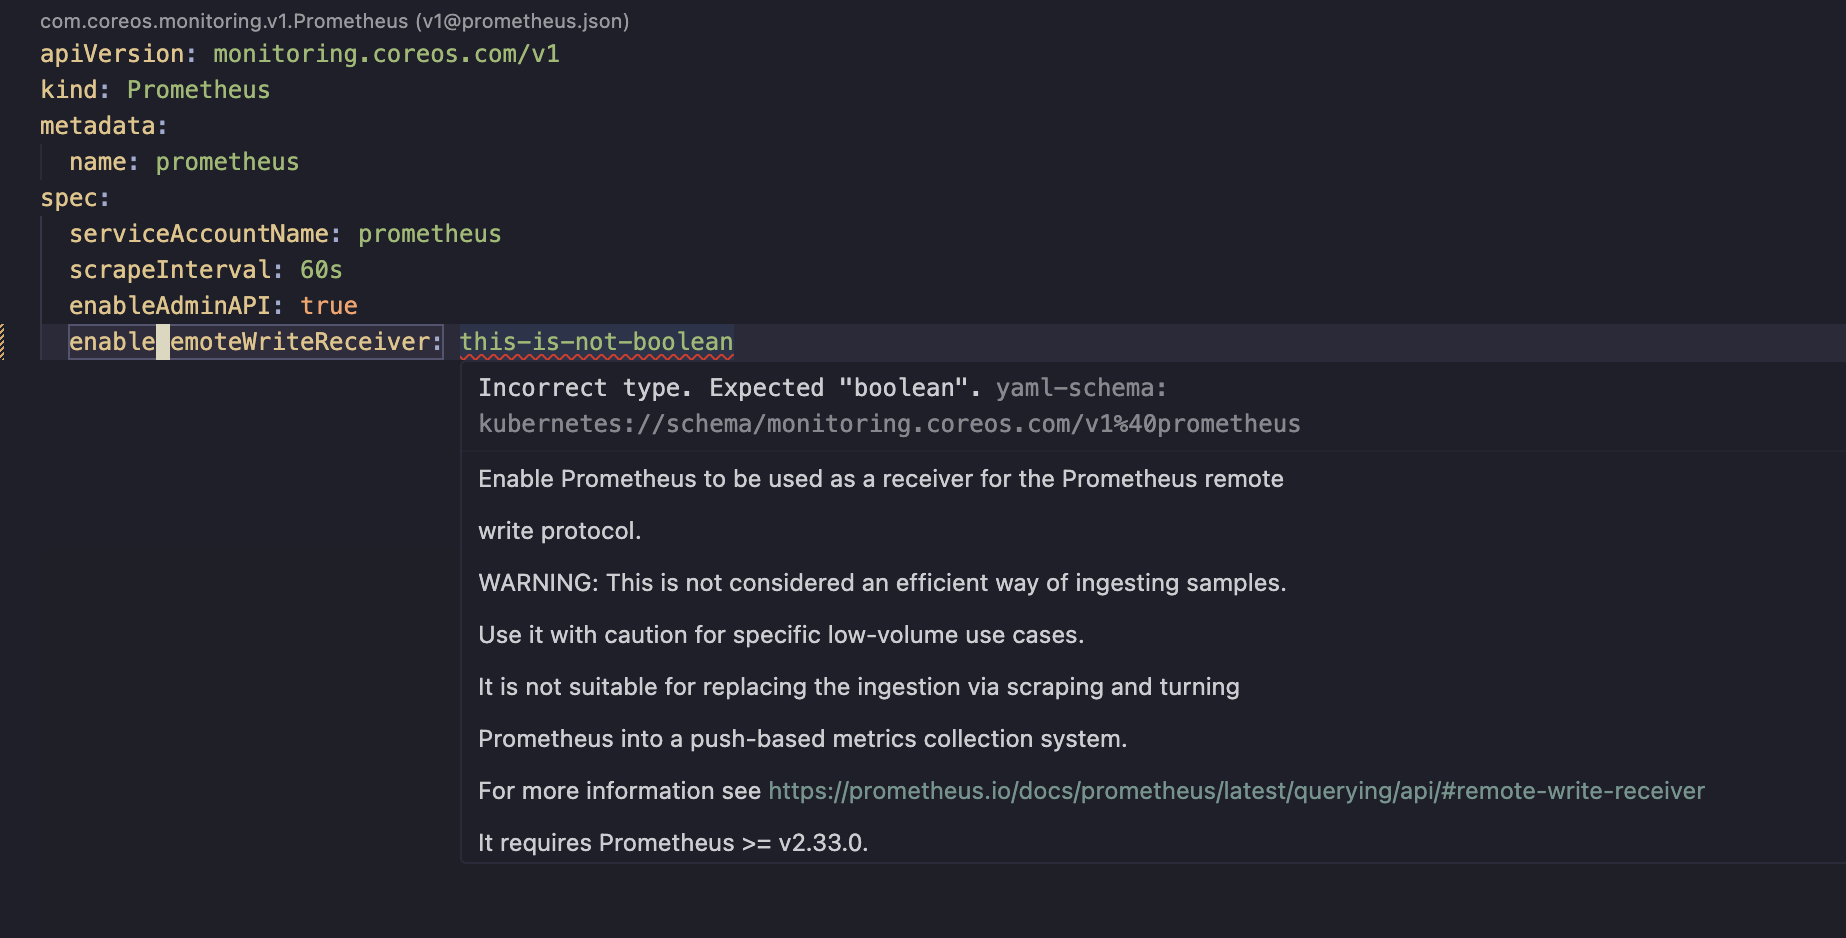
Once installed, you'll get real-time feedback when writing CRDs, or any Kubernetes resource. Open up any Kubernetes resource, start editing the YAML and you should see field suggestions pop up.

Hovering over a field shows us the documentation for this field, and if we get it wrong, for example setting a non-boolean for a boolean property, we get the appropriate hints.
CRD completion in Neovim
schema-companion.nvim provides some similar behaviour in Neovim. See the README for how to install it. I use the LazyVim approach, and with that in place the schema-companion package can be wired in with a lua plugin like this:
return {
"cenk1cenk2/schema-companion.nvim",
dependencies = {
{ "nvim-lua/plenary.nvim" },
{ "nvim-telescope/telescope.nvim" },
},
config = function()
require("schema-companion").setup({
matchers = {
require("schema-companion.matchers.kubernetes").setup({ version = "master" }),
},
})
end,
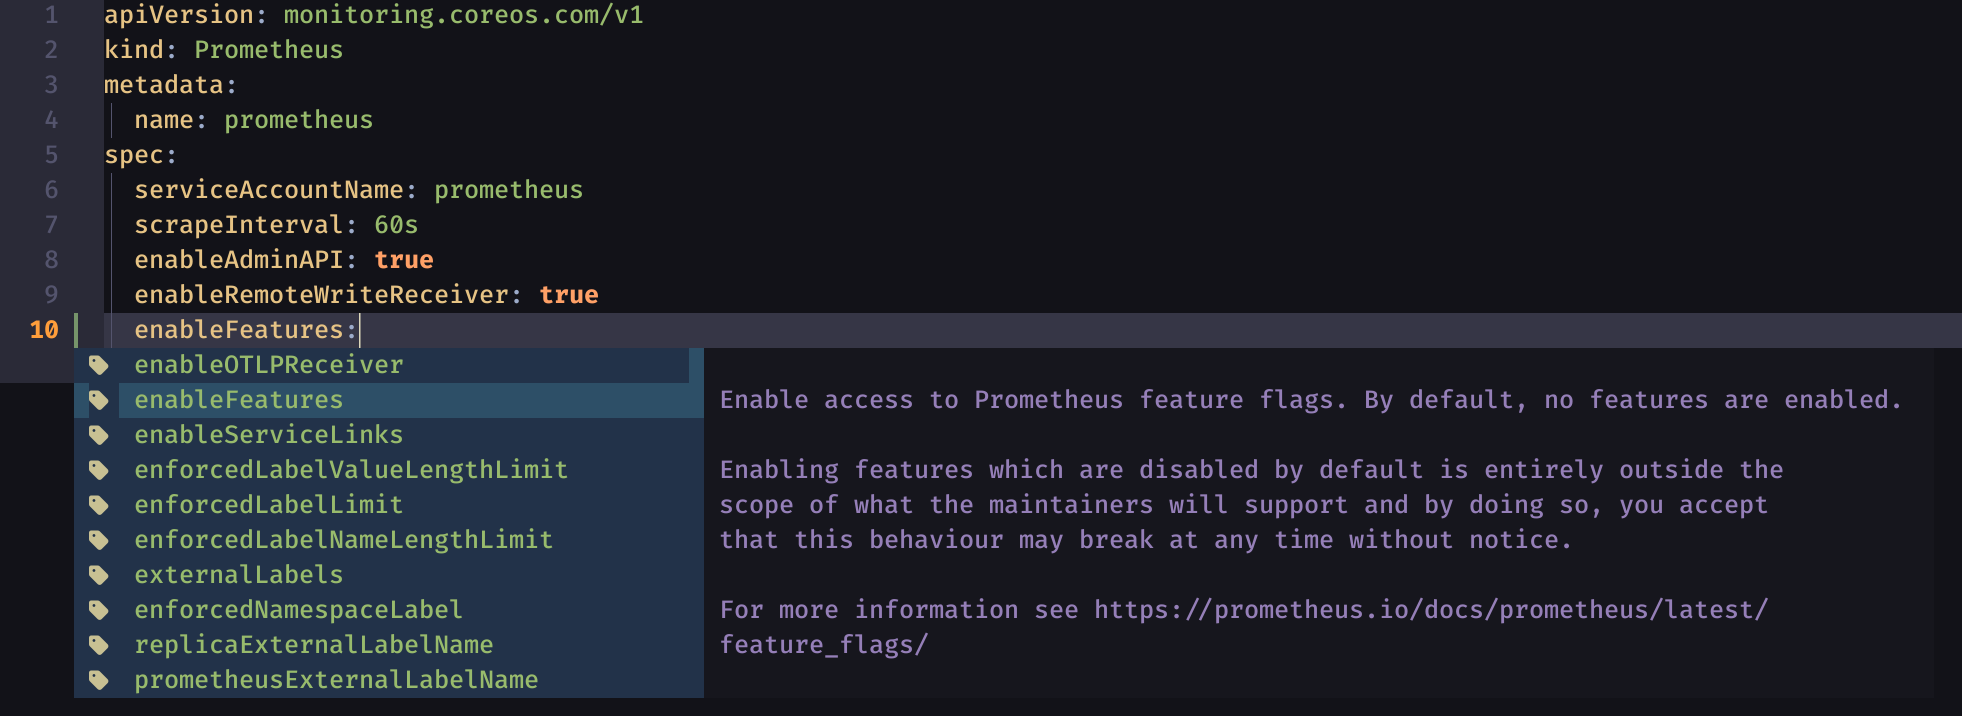
}This package gives us, a similar experience to what we saw earlier in VS Code:
- property suggestions as you type
- early validation of types and required fields
- inline documentation
Start typing in a CRD YAML, and you should see the property suggestions pop up:
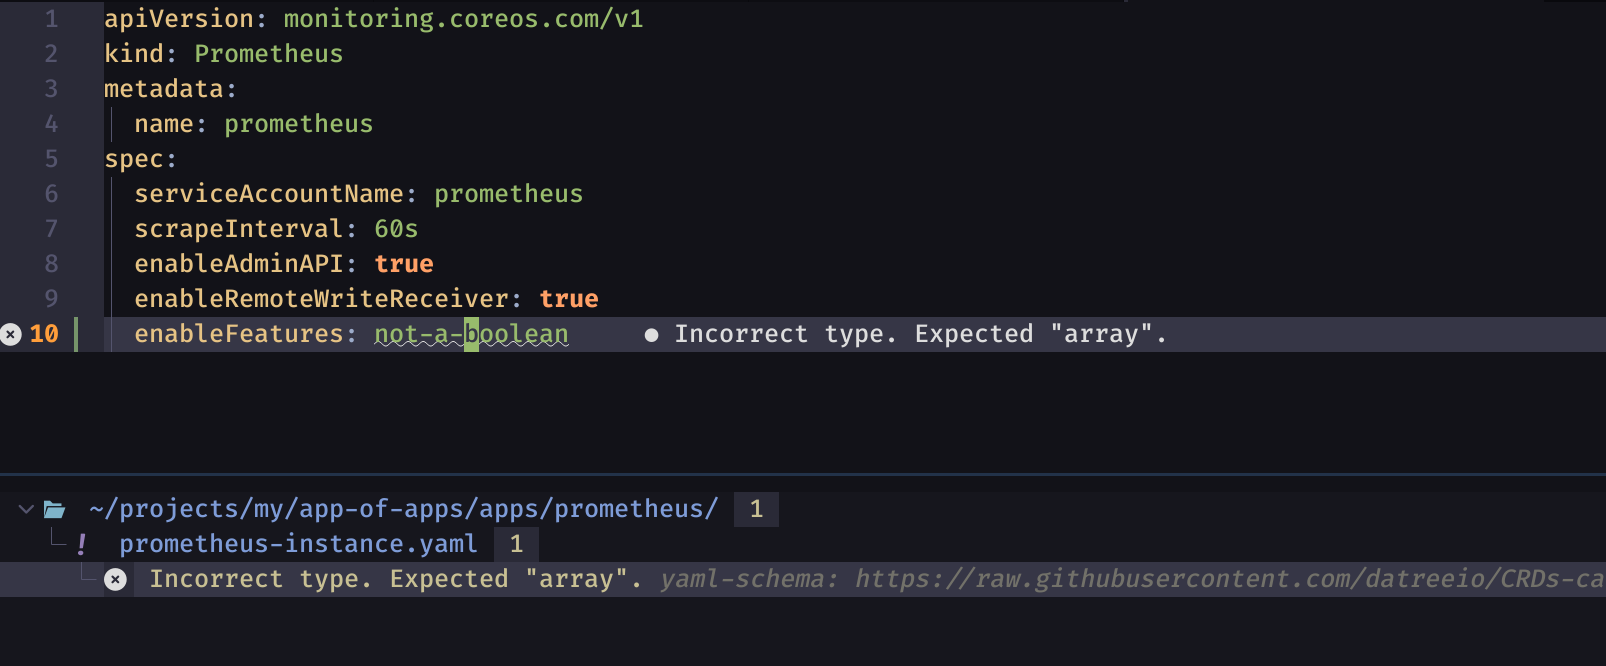
If something is wrong you'll see it immediately and can fix it there and then:
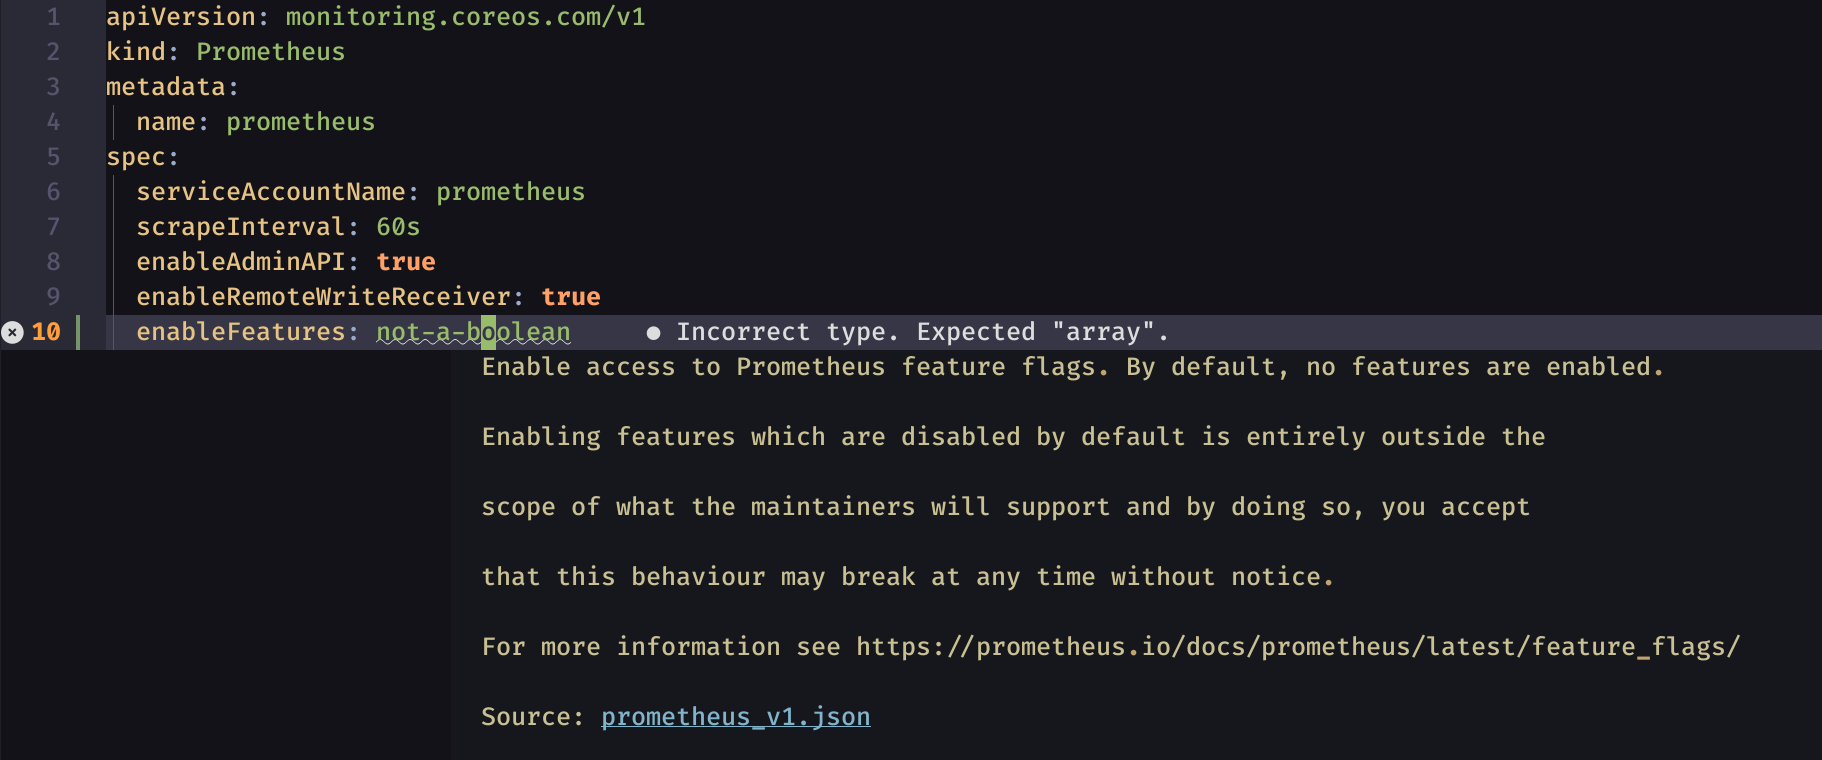
We can also see documentation inline. With the default LazyVim install, <shift-K>
will show this inline documentation:
If you look under the covers of this, you may notice that this plugin uses a CRD catalog that aggregates the JSON schemas of hundreds of public Kubernetes CRDs. It is also this CRD catalog that is used by kubeconform, a command line tool, which we'll explore next.
pre-commit checks
All well and good, we can now correct Kubernetes resource YAML files as we code. We should have prevented a few deploy-fail loops and saved a few trips to the documentation or your AI tooling. In general a healthy efficiency gain.
However we'll be good to follow this practice in our delivery pipeline to improve resilience for changes coming in from many engineers and agents. kubeconform provides a fast way to validate these resource files. It can be added into you GitHub or GitLab pipelines, however for now let's just get it in as a pre-commit check to show it in operation.
My go to commit hook tool is pre-commit, suitably language agnostic and has several useful out of the box plugins for code hygiene. For JavaScript based environment I might use husky which is equally useful. And that reminds me, I should try Lefthook one day. Which ever you use, just make sure you use one.
First install pre-commit to your local machine, then add the following
.pre-commit-config.yaml file to the root folder of your git repo. This defines
the checks you want to be applied prior to commits being applied.
repos:
  - repo: https://github.com/pre-commit/pre-commit-hooks
    rev: v5.0.0
    hooks:
      - id: trailing-whitespace
      - id: end-of-file-fixer
      - id: check-merge-conflict
      - id: check-yaml
        args:
          - --allow-multiple-documents
      - id: check-added-large-files
  - repo: local
    hooks:
      - id: kubeconform
        name: check for compliant kubernetes resources
        description: Checks kubernetes resources are compliant
        entry: ./pre-commit-kubeconform.sh
        language: system
        files: ^apps/
        types:
          - yaml
Change files: ^apps/ to file match for your kube resources in this project.
Next add the following pre-commit-kubeconform.sh files to the same folder and
chmod +x pre-commit-kubeconform.sh. This script uses kubeconform to check each
Kubernetes resources being applied in the commit.
#!/bin/bash

if ! command -v kubeconform > /dev/null 2>&1 ; then
  echo "Please install kubeconform - https://github.com/yannh/kubeconform"
  exit 1
fi

filename=$1

kubeconform -summary -verbose \
  -schema-location default -schema-location \
  'https://raw.githubusercontent.com/datreeio/CRDs-catalog/main//_.json' \
  $filename
Then run pre-commit install in the root folder to set up the git hooks. From
now on if you try to commit some invalid kube YAML it'll stop you and tell you
why.
❯ git commit -am "fix: adding some bad kube YAML"
trim trailing whitespace.................................................Passed
fix end of files.........................................................Passed
check for merge conflicts................................................Passed
check yaml...............................................................Passed
check for added large files..............................................Passed
check for compliant kubernetes resources.................................Failed
- hook id: kubeconform
- exit code: 1

apps/prometheus/prometheus-instance.yaml - Prometheus prometheus is invalid:
problem validating schema. Check JSON formatting: jsonschema validation failed
with
'https://raw.githubusercontent.com/datreeio/CRDs-catalog/main/monitoring.coreos.com/prometheus_v1.json'
- at '/spec/enableFeatures': got string, want array Summary: 1 resource found in
1 file - Valid: 0, Invalid: 1, Errors: 0, Skipped: 0
If you want to run pre-commmit against all files in your repository use
pre-commit run --all-files. This is useful if you've just added the pre-commit
configuration, if you've changed the pre-commit configuration or you are
suspicious that a file has not been previously validated right.
Validating early
With CRDs, and any Kubernetes resources, strictly defined by schemas, editors like VS Code and Neovim can guide us as we code. They suggest fields, point out if we've indented our YAML wrong yet again and provide quick access to documentation.
That's our first line of defence. It saves us referring back to the docs each time, makes errors quicker to fix and increases th chance we get it right first time. Helping us to stay efficient and in the zone.
The next line of defence to protect us is git commit pre checks. If we try to commit invalid YAML, we want the process to stop us, and point us to what needs fixing before we proceed. Maybe we missed the error in the editor or changed the YAML in some other way. pre-commit with kubeconform can help with that. These checks are quick to run and can be shared across the team to ensure everyone benefits from the same safeguards.
Since Git hooks are installed locally by each user, some engineers may have them
set up. Or perhaps we have committed with a --no-verify (ahem, for a "good"
reason that made sense at the time). That's were the pipeline checks can come
into good effect to enforce such guardrails more strictly - see kubeconform
guidance for Github Workflows and
GitLab-CI.
Finally, if you're in the trenches, and you just want to explore a CRD spec, the
trusted kubectl explain --recursive can prove incredibly handy.
kubectl explain --recursive prometheus.spec