How to Boot a Raspberry Pi from a Local SSD Drive
I've used a Raspberry Pi 4 in an Argon ONE M.2 case for a while. It allows me to attach an M.2 SATA SSD to my Pi, improving boot times and performance considerably. Let's go through how we can get the Pi booting from a SSD device.

Preparing Pi OS on a USB memory stick
I like to be able to SSH straight onto a new install with SSH keys, so let's
first prepare a SSH key on our local machine with ssh-keygen which we'll bake
into the install image.
ssh-keygen -t ed25519 -C "lab@adaptivekind.com" -f ~/.ssh/id_labCopy into the clipboard ready to add it to the image configuration in the steps below.
cat ~/.ssh/id_lab.pub | pbcopyOn your local machine, insert the USB drive, open up the Raspberry Pi Imager, select Raspberry Pi Device "Raspberry Pi 4", operating system "Raspberry Pi OS Lite (64-bit)" (under the Raspberry Pi OS (Other) section), select USB drive to write to and click next. I opt for Pi OS Lite for this image since this Pi acts as server and I don't need any desktop windows access. If you can access the microSD slot more readily, you may wish to install the initial image on the microSD.
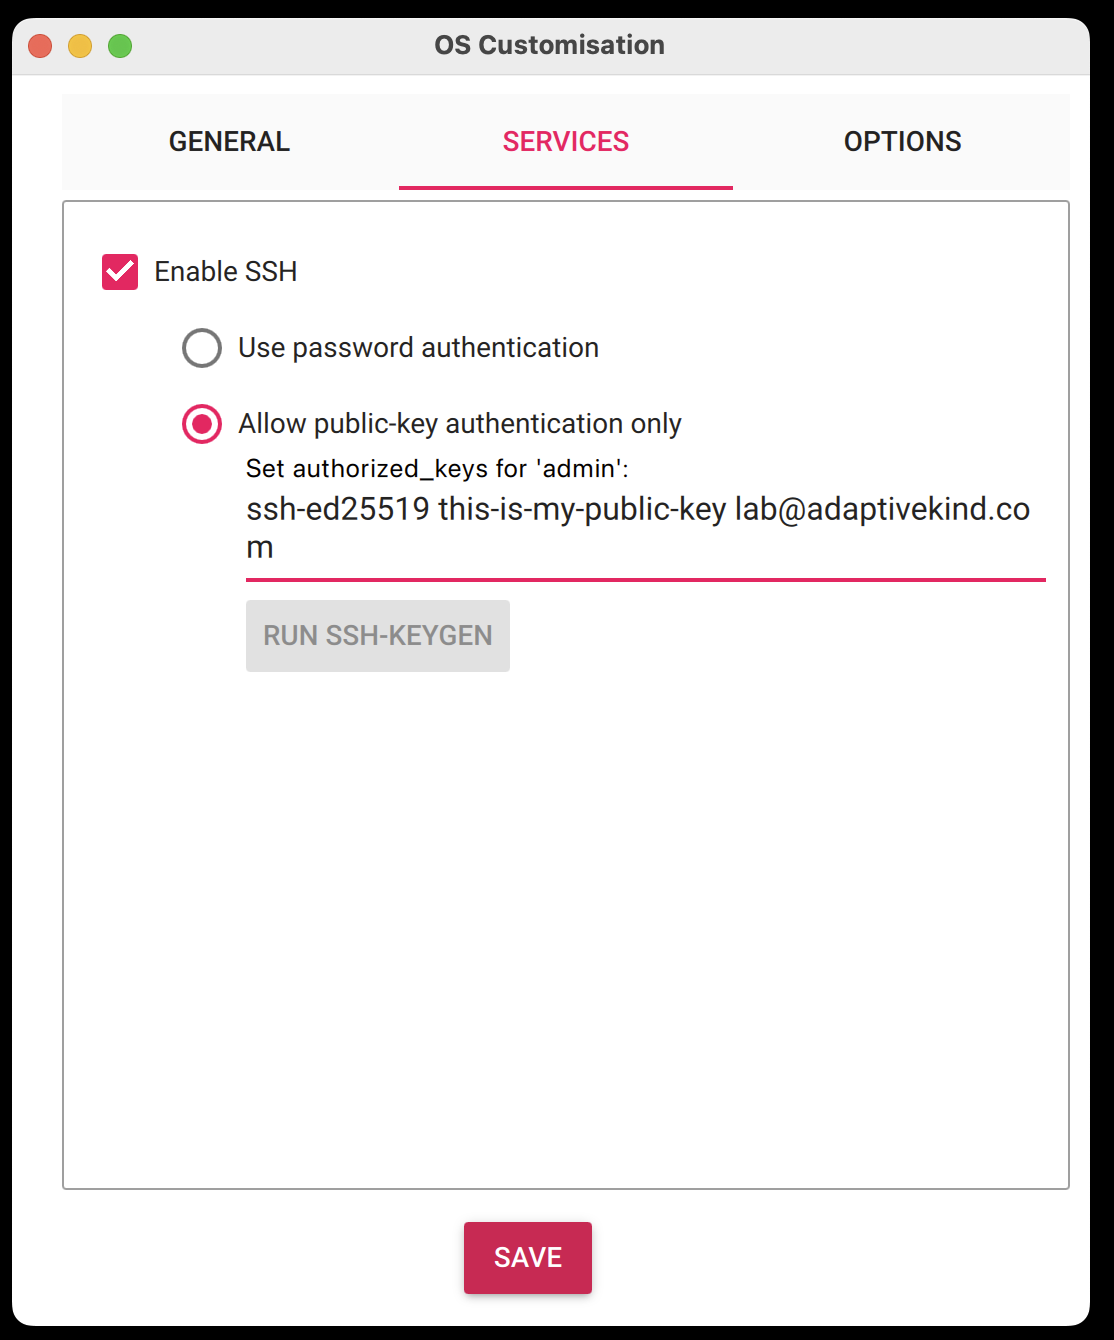
Configure the image to make connecting quicker once you boot up. Edit settings,
set the host name to, e.g., angus and set an admin username and password.
Configure WiFi connection at this point if desired. If you connect over wired
Ethernet you can skip the WiFi connection. Under the services tab, enable SSH,
select allow public-key authentication only, copy in the SSH key from our
clipboard and click save.
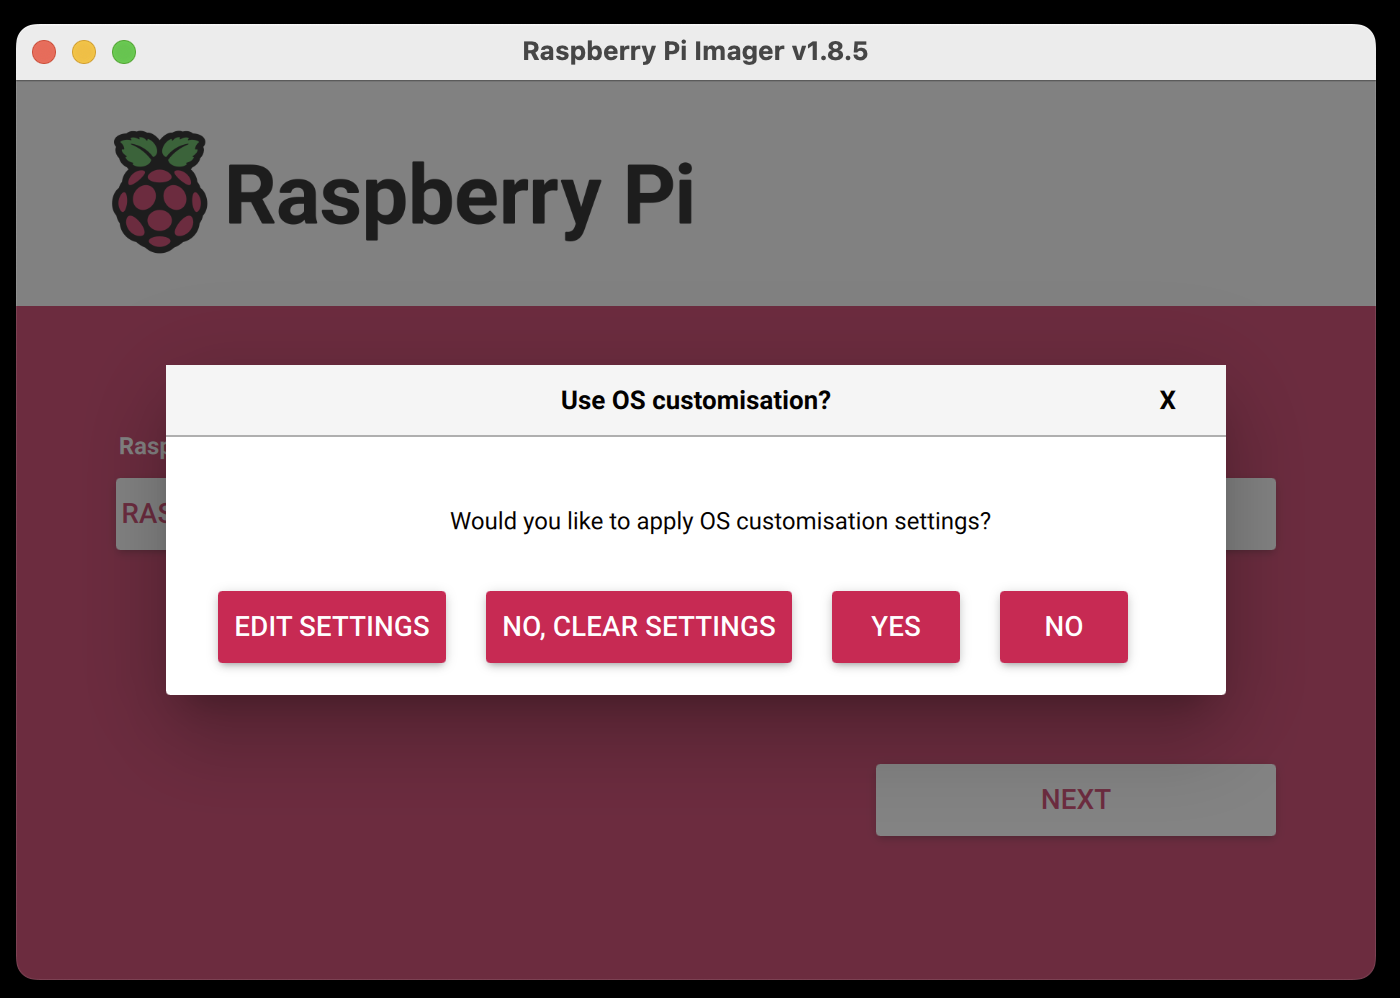
Click "YES" to apply customisation settings and click "YES" to acknowledge that this will erase existing data on USB drive and write the image to the USB drive. Note that the Raspberry Pi imager will remember this customisations settings on your local machine for next time so repeating these steps are easier.
Once completed you can remove the USB drive from your local machine ready for spinning up on your Pi.
Boot up and initial log in
The microSD on the Argon ONE case is only accessible if I unscrew the case, which is why I prefer to prepare an install image on a USB thumb drive that I can mount with more ease. The SSD drive on the Argon ONE connects via a USB loop back dongle which plugs into one of the USB ports on the Raspberry Pi board. I can remove this USB dongle temporarily when I want to boot from a USB memory stick which is easier than unscrewing the case.

On this initial boot I attach the USB memory stick with the new image to the Pi, and remove the SSD USB dongle so that the system boots from my new image instead of any boot image on the SSD drive. If you've gone for installing the image on a microSD you can configure the Raspberry Pi boot sequence so it boots from microSD first and then USB so that the system boots from the microSD first and once moved to the SSD drive you can remove the microSD card so that the system boots from the SSD drive.
Turn on the Raspberry Pi and let the Raspberry Pi boot up and initialise. This
should just take a couple of minutes. Once the Raspberry Pi has started SSH onto
to the Pi. You may need to register the SSH key locally, e.g. with the ssh-add
command.
ssh-add ~/.ssh/id_lab
ssh admin@angus
Once logged in, if haven't done so already, you can connect the SSD drive. In my case this is a matter of putting the SSD USB dongle back in.
Partition the SSD drive
I've got a 240GB SSD drive connected. I would like to limit the space for the boot and root partition to leave space for other partitions that I can use for other data mounts. Separating data from the root partition helps with data management through upgrades and other customisations such as setting up an encrypted file system.
Let's go for 480MiB for the boot partition and then 48GB, 20% of the drive, for
the root partition. We can create these partitions with the
parted command.
Also follow the similar structure to that created by the Raspberry Pi Imager on the
USB stick or microSD card. We can see this structure by running parted print against the
USB memory stick device.
$ sudo parted /dev/sda print
Model: SanDisk Extreme (scsi)
Disk /dev/sda: 62.7GB
Sector size (logical/physical): 512B/512B
Partition Table: msdos
Disk Flags:

Number  Start   End     Size    Type     File system  Flags
 1      4194kB  541MB   537MB   primary  fat32        lba
 2      541MB   62.7GB  62.2GB  primary  ext4
We'll drop into an interactive sudo shell for the next commands with
sudo -iand then partition the drives
parted /dev/sdb mklabel msdos
parted /dev/sdb mkpart primary fat32 0% 1048559s
parted /dev/sdb mkpart primary ext4 1048560s 20%
I choose 1048559s boundary for optimal alignment for my drive
whilst minimising the size of the boot partition. See GNU Parted: Solving the dreaded "The resulting partition is not properly aligned for best performance" for tips on getting the best alignment.
Check that the partition has optimal alignment for the start and end locations
you picked.
parted /dev/sdb align-check opt 1
parted /dev/sdb align-check opt 2
Make the file systems on each partition, matching the file systems on your memory stick or MicroSD card.
mkfs -t vfat -F 32 /dev/sdb1
mkfs.ext4 /dev/sdb2
Clone the OS from USB stick to SSD
You are now ready to clone the OS from the USB stick. You can use rpi-clone to clone the OS from the USB stick onto the SSD. Bill Wilson initially created billw2/rpi-clone in 2013 and Jeff Geerling took up the baton in February 2024 by creating an updated fork. geerlingguy/rpi-clone hosts the latest version of this.
Install rpi-clone and clone to the /dev/sdb device, i.e. the SSD drive. You
will still need to be in the interactive sudo shell.
sudo -i
curl https://raw.githubusercontent.com/geerlingguy/rpi-clone/master/install | bash
rpi-clone sdb
This first asks for confirmation of what is about to happen:
Booted disk: sda 62.7GB                    Destination disk: sdb 240.1GB
---------------------------------------------------------------------------
Part               Size    FS     Label           Part   Size    FS     Label
1 /boot/firmware   512.0M  fat32  --              1      479.5M  fat32  --
2 root              57.9G  ext4   rootfs          2       44.2G  ext4   --
---------------------------------------------------------------------------
== SYNC sda file systems to sdb ==
/boot/firmware        (63.5M used)   : SYNC to sdb1 (479.5M size)
/                     (1.9G used)    : SYNC to sdb2 (44.2G size)
---------------------------------------------------------------------------
Run setup script       : no.
Verbose mode           : no.
-----------------------:

Ok to proceed with the clone?  (yes/no):
Enter "yes" to proceed. It may take a few minutes to complete the clone. You should see a log of what happened, e.g.
Syncing file systems (can take a long time)
Syncing mounted partitions:
  Mounting /dev/sdb2 on /mnt/clone
mount: (hint) your fstab has been modified, but systemd still uses
       the old version; use 'systemctl daemon-reload' to reload.
  => rsync // /mnt/clone with-root-excludes ...
  Mounting /dev/sdb1 on /mnt/clone/boot/firmware
mount: (hint) your fstab has been modified, but systemd still uses
       the old version; use 'systemctl daemon-reload' to reload.
  => rsync /boot/firmware/ /mnt/clone/boot/firmware  ...

Editing /mnt/clone/boot/firmware/cmdline.txt PARTUUID to use 8bcefdd4
Editing /mnt/clone/etc/fstab PARTUUID to use 8bcefdd4
===============================
Done with clone to /dev/sdb
   Start - 18:38:10    End - 18:39:13    Elapsed Time - 1:03

Cloned partitions are mounted on /mnt/clone for inspection or customizing.

Hit Enter when ready to unmount the /dev/sdb partitions ...
Once completed, click "Enter" to unmount the cloned drive and shutdown.
shutdown nowRemove the USB thumb drive and start up the Pi again to boot from the SSD device. If all goes OK, then you can SSH back into the Pi with the same credentials as before.
ssh admin@angusPerformance gain
You can quickly check the IO performance gain with some writes and reads with
the dd command.
dd if=/dev/zero of=./speed-test.dat bs=20M count=50 oflag=direct ; \
dd if=./speed-test.dat of=/dev/zero bs=20M count=50 oflag=dsync
Which shows, for me, a 10 fold IO performance gain on the SSD device over the USB memory stick.
| Type | Read | Write |
|---|---|---|
| USB memory stick | 36 MB/s | 26 MB/s |
| SSD | 380 MB/s | 229 MB/s |
Cheat sheet
In summary, we can set up a Raspberry Pi to boot off SSD as follows.
- Prepare a customised image on removable drive
- Attach removable drive and starting up
- SSH in to machine
- Attach SSD device
- Prepare partitions (or skip if happy with rpi-clone defaults)
- Create file systems (or skip if happy with rpi-clone defaults)
- Run rpi-clone
- Remove removable drive and restart
sudo -i
# Prepare partitions
parted /dev/sdb mklabel msdos
parted /dev/sdb mkpart primary fat32 0% 1048559s
parted /dev/sdb mkpart primary ext4 1048560s 20%
# Create filesystems
mkfs -t vfat -F 32 /dev/sdb1
mkfs.ext4 /dev/sdb2
# Run rpi-clone
curl https://raw.githubusercontent.com/geerlingguy/rpi-clone/master/install | bash
rpi-clone sdb
shutdown now